 Loading... Please wait...


 Euro

 My Account
 Cart


Bixenon Wiring Diagram (Battery)
Posted by HIDS-DIRECT on 30th Jan 2014
H4 Bi-Xenon HID Kit: Battery Relay Loom Installation Guide
This guide explains how to connect an H4 Hi/Lo HID conversion kit with a battery relay wiring loom. The loom supplies power to both ballasts from the battery, while one original H4 headlight socket controls the dipped and main beam functions.
The instructions below apply to the twin-bulb relay loom shown in the diagram. Connector shapes and colours may vary between kits, so check your supplied components before starting.
Before you start
- Check that the kit voltage matches your vehicle's electrical system.
- Switch off the headlights and ignition, remove the key and allow the lamps to cool.
- Follow the vehicle manufacturer's battery isolation procedure and disconnect the battery negative terminal before wiring.
- HID systems produce high voltage. Never connect, unplug or handle the bulb-side wiring while the system is powered.
- If you are unsure about any connection, ask a qualified auto electrician to install the kit.
Download the H4 HID Installation Guide (PDF)
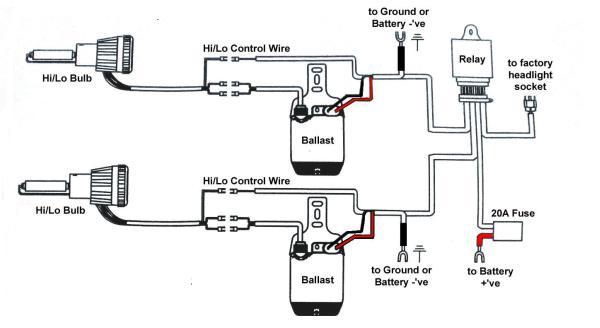
H4 HID Battery Loom Wiring Diagram
Battery power
The thick red lead connects to battery positive (+) through the inline fuse. Both black earth leads connect to suitable clean chassis earth points or battery negative (-).
Headlight control
The loom's 3-pin trigger plug connects to one original H4 headlight socket. The relay loom then supplies both sides of the kit.
Components to Check
- Two H4 bi-xenon Hi/Lo HID bulbs.
- Two compatible HID ballasts.
- A battery relay loom with an inline fuse and a 3-pin H4 trigger connector.
- Matching ballast supply connectors and Hi/Lo control connectors.
- Suitable mounting hardware and cable ties.
Mounting accessories and connector designs vary by kit. Check the contents of your specific kit before installation.
Step-by-Step Installation
- Plan the installation
Lay out the bulbs, ballasts and relay loom. Identify the battery feed, both earth leads, ballast inputs and Hi/Lo control plugs. Plan cable routes away from exhaust components, fans, belts, sharp edges and moving parts. - Fit the H4 HID bulbs
Remove the original H4 bulbs and fit the HID bulbs securely in the headlight housings. Make sure each bulb is correctly seated and retained. Avoid touching the glass, and refit the dust covers or seals without trapping cables. - Connect each bulb to its ballast
Connect the two round HID quick-disconnect plugs from each bulb to the matching ballast leads. Seat the connectors fully without forcing them. - Connect the Hi/Lo control wires
Connect each bulb's small rectangular Hi/Lo control plug to the matching branch of the relay loom. These connections operate the bulb's dipped/main beam mechanism. - Connect the loom to both ballast inputs
Connect the relay loom's power plugs to the low-voltage input on each ballast. The original diagram uses oval connectors with sealing rings; your kit's connector appearance may differ. - Connect one original H4 headlight socket
Plug the loom's 3-pin H4 trigger connector into one of the vehicle's original headlight sockets. With this loom, the second original socket is unused. Secure and protect the unused socket from moisture and short circuits. - Mount the ballasts and relay
Secure the ballasts and relay in suitable protected locations using appropriate brackets or fixings. Keep them clear of excessive heat and moving components. Do not drill holes into the ballast cases. - Connect the earth leads and fused battery feed
With the battery still isolated, connect both black earth leads to sound, clean chassis earth points or battery negative. Connect the thick red fused lead to battery positive. Keep the fuse holder accessible and secure the wiring so it cannot rub, stretch or become trapped. - Inspect and reconnect
Check polarity, connector seating, cable routing and all mountings. Make sure the bulbs are enclosed in the headlamps and the weather seals are correctly fitted. Reconnect the battery following the vehicle manufacturer's procedure. - Test dipped beam and main beam
Switch on the headlights and allow the HID lamps to stabilise. Check both dipped beam and main beam, including the flash function. Watch for flickering, loose connections or excessive heat, and have the headlight aim and beam pattern checked with suitable equipment.
Important fuse information: The original diagram shows a 20A fuse. Always use the fuse rating specified for your supplied loom. Never bypass the fuse or install a higher-rated fuse to overcome a fault.
Troubleshooting
Neither HID bulb lights up
Switch off and isolate the power before checking the inline fuse, battery positive connection, both earth connections and the original H4 trigger plug. Confirm that the kit and loom are suitable for the vehicle's electrical system.
Only one HID bulb lights up
With power isolated, check the affected side's earth, ballast input and bulb-to-ballast connectors. Make sure each plug is fully seated and that no terminals or cables are damaged.
The bulbs light up but do not change between dipped and main beam
Check both small Hi/Lo control connectors and the loom's original H4 trigger connection with power isolated. Some vehicles use switched-earth headlight circuits and may require a compatible loom or adapter. Do not guess the pinout or bridge terminals.
The lights flicker or the relay chatters
Check for loose connections and poor earths with power isolated. Vehicle bulb monitoring or a pulsed headlight supply may also affect compatibility. Ask for advice before adding adapters or changing the wiring.
The fuse blows or the wiring becomes hot
Switch off immediately and isolate the power safely. Have the wiring checked for a short circuit, incorrect connection or component fault before using the kit again. Never bypass the fuse or increase its rating.
Need help with your H4 HID kit?
Contact HIDS-DIRECT through our website with your order number, vehicle details and clear photos of the loom and connectors so we can help identify the correct connections.
This guide explains the wiring arrangement shown in the diagram. Follow any kit-specific instructions supplied with your product. Installation guidance does not establish approval for road use.
Recent Posts






Quick Links
Support
Subscribe For Newsletter
Sign up for our newsletter and receive updates and special offers!

All prices are in GBP © 2026 HIDS DIRECT Store. All rights Reserved | Sitemap
hids-direct.co.uk, Car Part Hut Ltd, UK Registered 13039569 VAT Number GB 365025020
Registered office 140 LEE LANE BL6 7AF HORWICH GB