 Loading... Please wait...
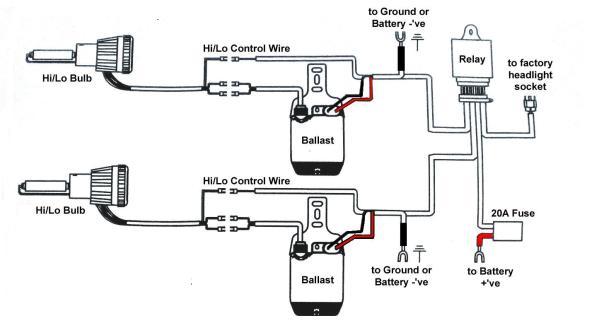
Bixenon Wiring Diagram (Battery)
Posted by HIDS Direct Ltd on 30th Jan 2014
Bi-Xenon Installation Instructions:Battery Wiring Diagram
1. Verify that the HID Conversion Kit you received have all the component needed for the installation (A list of component available below)
2. Clean all connectors and wipe the HID bulbs and connectors with rubbing alcohol
3. Install the HID bulbs into the headlight housing
4. Connect the HID bulbs to the ballast (2 round quick-disconnects)
5. Connect the high beam control wires (small rectangular connectors)
6. Connect the ballasts to the Hi/Lo wiring harness (oval connectors with yellow rubber seals)
7. Connect the 3-pin socket on the wiring harness to ONE of the headlight sockets
8. Connect the thick red wire to the battery positive
9. Connect the thick black wires to the battery negative or ground
10. Mount the ballast and clean up the wiring harness with zip ties
11. Find a mounting location for the ballast. Use the ballast bracket, screws or zip-ties as needed.
Note: Do not drill holes on the ballast box, mount away from moving components and mount to a secure location.
12. Turn headlight switch on and allow your new xenon light to run for 10 minutes

www.hids-direct.co.uk
Recent Posts
All prices are in DKK © 2025 HIDS DIRECT Store. All rights Reserved | Sitemap
hids-direct.co.uk, Car Part Hut Ltd, UK Registered 13039569 VAT Number GB 365025020
Registered office 140 LEE LANE BL6 7AF HORWICH GB


 Euro
Euro


